Blakes 21 Days Appendix C
APPENDIX C
Fixing a Problem with the Android Studio Emulator
- Top
- 609 The free Android Studio integrated development environment (IDE) has become the official tool for creating Android apps since its release in 2014.
- You learned how to create mobile apps in Java with this IDE during Day 21, "Writing Android Apps with Java." - Link
- 609 If you have read that chapter and have successfully run an app in an Android emulator, you don't need to read this appendix.
- 609 But if you couldn't make the emulator work at all, you're in the right place.
- reserve
Problems Running an App
- Top
- 610 When you are working on an Android project in Android Studio and you want to run the app,
- you can choose the menu command Run, Run App.
- 610 This command opens a Choose Device dialog that asks for the device where the app should be executed.
- The device can be a real Android phone or tablet, if it's connected to your computer over a USB cord and configured to test apps.
- The device also can be an Android emulator.
- 610 The Android emulator can act like actual phones and tablets that run the mobile OS.
- A virtual device can be set up for multiple Android virtual devices.
- When you install Android Studio, there's just one choice, which currently is Nexus 5 API 23 x86.
- This emulates a Nexus 5 phone from LG running version 23 of the Android API on an x86 processor.
- 610 Some users experience problems running an Android app for the first time with an emulator in Android Studio.
- The emulator crashes with this ominous message:
Output >
ERROR: x86 emulation currently requires hardware acceleration!
Please ensure Intel HAXM is properly installed and usable. CPU
acceleration status: HAX kernel module is not installed!
- Top
- 610 This error occurs on Windows computers and indicates that they need a hardware acceleration program from Intel
- called the Hardware Accelerated Execution Manager (HAXM) before the emulator will work.
- This program can be downloaded in Android Studio, but you must install it outside of the IDE.
- 610 HAXM is a hardware virtualization engine for computers with Intel processors that speeds up Android development by making emulators run faster.
- One of the biggest bottlenecks in app programming for Android is how slowly emulators load.
- 610 Before you set up HAXM, you must add it to the Android SDK in Android Studio.
- Top
- 610 CAUTION: HAXM only should be installed on computers with an Intel processor.
- This appendix resolves a problem where Android Studio indicates that it needs HAXM to run the Android emulator.
- If the emulator is failing with an error message that does not mention HAXM, don't use this appendix to fix it.
Install HAXM in Android Studio
- Top
- 611 HAXM can be downloaded and added to the Android SDK as you're running Android Studio.
- Click the Android SDK Manager button in the Android Studio toolbar, which is identified in Figure C.1.
Figure C.1 - Running the Android SDK Manager. - goes here

- Top
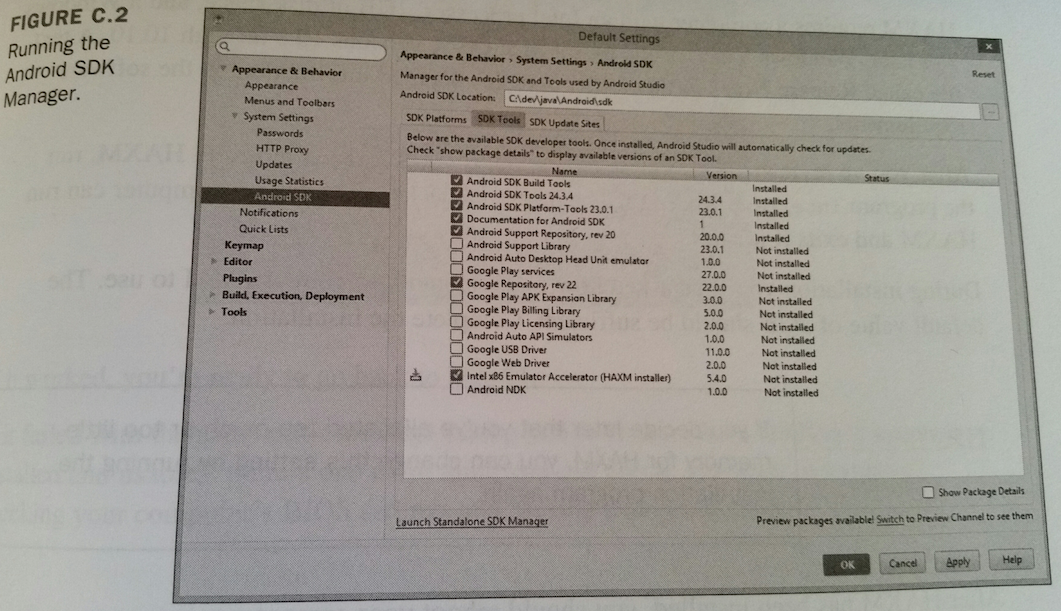
- 611 The Android SDK Manager is used to enhance the SDK with additional versions of Android and useful SDK tools.
- Click the SDK Tools tab to bring it to the front.
- 611 The tools available for the SDK will be listed along with a check mark next to the ones you already have installed.
- Look for the item Intel x86 Emulator Accelerator (HAXM Installer).
- 611 If there's no check mark next to this item, it hasn't been added to the Android SDK in your copy of Android Studio.
- (If there is a check mark, it already has been installed, so you should proceed to the next section, "Install HAXM on Your Computer.")
- 611 The Android SDK Manager is shown in Figure C.2.
Figure C.2 - Running the Android SDK Manager. - goes here
- Top
- 612 Select Intel x86 Emulator Accelerator (HAXM) Installer) and click OK.
- You will be asked to confirm this change, click OK.
- 612 Android Studio will download HAXM and report its progress.
- If it installs correctly, you're ready to proceed to the next step and install it on your computer.
Install HAXM on Your Computer
- Top
- 612 To begin setting up HAXM on your computer, first close Android Studio.
- 612 In your file system, find the folder where you told Android Studio installation wizard to store the Android SDK.
- 612 If you don't remember where you put it, the default on Windows is to put the SDK in your personal user folder in a subfolder called AppData\Local\Android\sdk.
- So if your Windows username is Catniss, the suggested SDK location is \Users\Catness\AppData\Local\Android\sdk.
- 612 If you find the SDK's folder on your computer, open that folder, and then open the subfolder extra\intel\Hardware_Accelerated_Execution_Manager.
- 612 The folder contains a program called intelhaxm-android.
- This is the HAXM installation program.
- 612 HAXM requires a computer with an Intel processor, 1 GB of disk space, and a Windows 7 or later, Windows Vista, or the 64-bit Mac OS X versions 10.8 thru 10.10.
- A text file called Release Notes in this folder contains detailed information on the software requirements.
- 612 After you're reviewed the Release Notes file, if you are ready to install HAXM, run the program intelhaxm-android.
- The installer checks whether your computer can run HAXM and exits if it can't.
- 612 During installation you'll be asked how much memory to allow HAXM to use.
- The default value of 2GB should be sufficient.
- Complete the installation.
- Top
- 612 TIP: If you decide later that you're allocated too much or too little memory for HAXM, you can change this setting by running the installation program again.
- 612 After HAXM has been installed, you should reboot your computer.
- 613 When that's complete, load Android Studio and try to run your Android app again by choosing Run, Run App.
- 613 The app should run in an emulator.
- The Android emulator looks like a phone, displays an "Android" boot screen while it's loading, and then runs the app.
- Figure C.3 shows what the Palindrome app looks like when it has been run successfully.
Figure C.3 - Success! The emulator loads and runs an app. - goes here

- Top
- 213 If it worked, you're ready to go back to Day 21.
- 213 If it failed with the same error message asking you to "ensure Intel HAXM is properly installed and usable," there's one more thing you can check.
- However, it requires checking your computer's BIOS settings and making changes to them.
Checking BIOS Settings
- Top
- 614 For HAXM to work, your computer's BIOS must have Intel Virtualization Technology enabled in its settings.
- If you are an experienced computer user who is comfortable making changes to BIOS, this is a straightforward doing to check and change.
- 614 Because changes to BIOS can effect how your computer boots
- - or even stop it from booting Windows at all -
- you should poke around in BIOS only if you have made BIOS changes to a computer before.
- Otherwise, you should recruit the help of someone else who is an expert and can guide you through the process.
- Top
- 614 BIOS is the software that controls a Windows computer when you turn it on, taking care of booting the computer and other necessary hardware functions.
- 614 While your computer is booting, you briefly see a message about hitting a function key to check your BIOS settings.
- 614 If you don't hit this key, BIOS completes its work and Window loads.
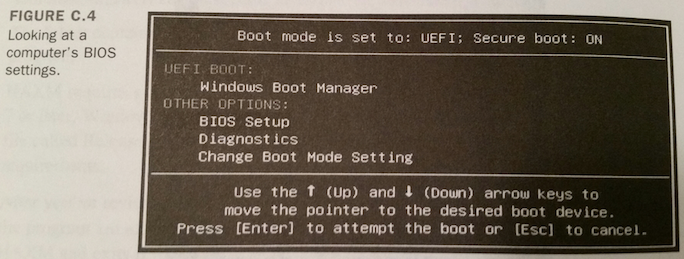
- 614 If you do hit the key, you see a screen like the one in Figure C.4
Figure C.4 - Looking at a computer's BIOS settings. - goes here.
- Top
- 614 Your computer's main menu for BIOS might look different from the one in Figure C.4.
- It varies depending on your computer manufacturer and the version of BIOS it uses.
- 614 On my Dell PC, I found out whether Intel Virtualization Technology was enabled by choosing BIOS Setup, Advanced, Processor Configuration.
- A list of processor settings was presented with [Enabled] or [Disabled] next to each one.
- These could be toggled from one setting to the other.
- 614 If you enable Intel Virtualization Technology in BIOS and save the change,
- your computer should be able to run HAXM, and the emulator problem should be resolved.
Reserve